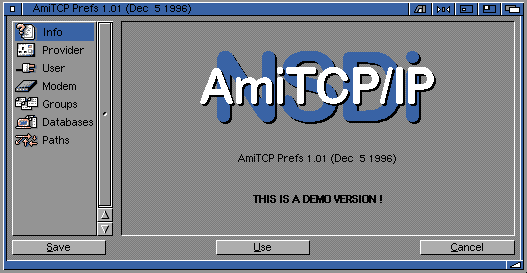
4 Configuring AmiTCP Prefs

This page, as described within the getting online section is quite self- explanatory. This section allows you to choose an Internet Service Provider from our list of entries.
If the "Show Provider Info" button is unghosted, you can read some extra information about your provider.
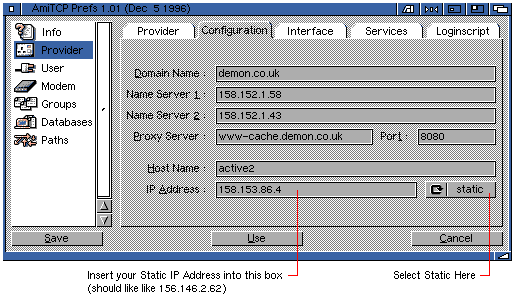
Usually this page will only have to be touched if you are using a provider like Demon Internet who require you to insert your IP address as you have a static connection to the Internet.
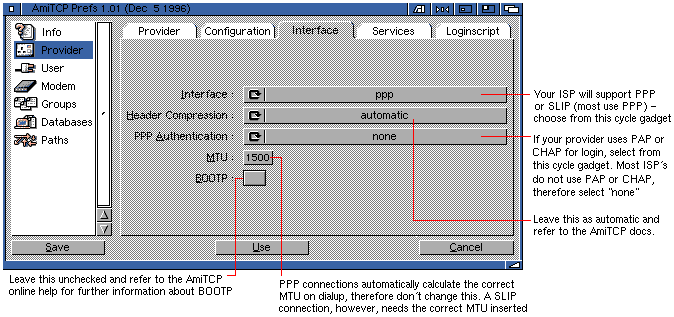
This page is really for users of providers that let you choose between accessing their services via a PPP or SLIP connection. A SLIP connection can only be maintained if you have a static connection to your provider (this means you have an IP address given to you by your ISP). We suggest to leave this set to PPP unless you are a advanced user.
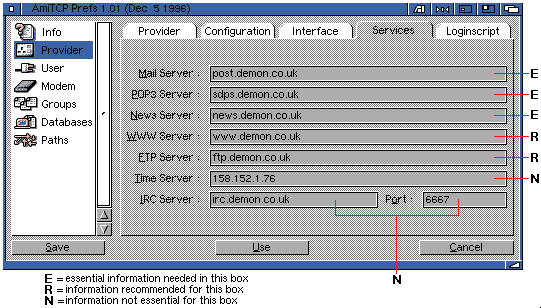
The services page contains extensive information about your provider. For example, what is their mail server, ftp server etc. Some of this information is not important for the AmiTCP prefs but is important for other programs. Other programs within NetConnect are highly likely to use this information.
For example a mail program could use the mail and pop3 server for its configuration, whilst a news program could use the news server.
This just makes configuring the other programs contained within NetConnect a little easier - as they will have inserted some of the information you require into their settings anyhow.
The information that is essential is indicated by the key in the image. "E" means essential information needed for other programs, "N" means not that essential - ie. you can insert the information and other programs will use it (but will still operate without it). "R" means recommended that information is inserted into these boxes (ie. your WWW site for your ISP could be used for reference purposes - Demon Internet, for example, have operational and day-to-day information on their web site www.demon.net).
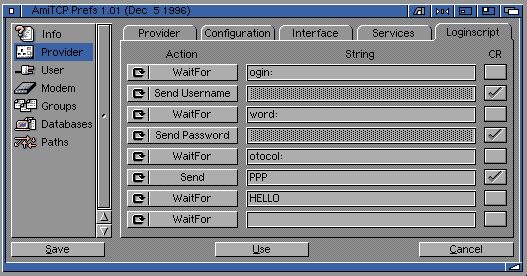
If you have selected a provider from within our list it is highly likely that you will not have to type anything into this section.
However, beware! Some providers use something called a PAP or CHAP configuration. This means they don't require any kind of loginscript!
Netcom use PAP in the UK and many of the European providers also use PAP. If your provider uses PAP, this loginscript area will be completely blank!
How do you know your provider uses PAP or CHAP? If you go to the "Interface" section it will say "PPP Authentication:". If this says PAP or CHAP, you will not need to create a loginscript.
If you are not sure if your provider uses PAP or CHAP either contact them and ask or contact us.
There are four main commands that can be used within the Loginscript.
The WaitFor command allows you to wait for a string that is sent by your provider. For example:
| WaitFor "login:" |
| WaitFor "Password:" |
| WaitFor "PPP" |
These are just a number of examples of the type of string which the WaitFor command can be used for. An ISP, for instance, may require a WaitFor "username:" command instead of WaitFor "login:".
The Send command sends data back to your provider.
The Send command is nearly always used after a WaitFor variable. For instance if your ISP asks you which protocol you want to use ("protocol" meaning if you want to use SLIP or PPP for connection) you would respond by sending a command that you want to use PPP. For example:
| WaitFor "protocol:" |
| Send "ppp" |
![]()
For instance if you had a loginscript similar to:
| WaitFor "login:" |
| Send Username |
| WaitFor "password:" |
| Send Password |
| WaitFor "protocol:" |
| Send "ppp" |
| WaitFor "ready..." |
...you would need to add a carriage return after Send "ppp" or the loginscript would just freeze. The carriage return (CR) just allows you to move to the next line.
The Send Username and Send Password commands are very important. They are automatic commands sent by the loginscript.
Send Username takes your loginname from your User Info (within the AmiTCP prefs) and sends it automatically for you!
Confused? It's quite easy really. Here's an example:
| WaitFor "login:" |
| Send Username |
If your loginscript started like the above - when you dial your provider the login script would really send:
| WaitFor "login:" |
| Send "your loginname" |
ie. "your loginname" would actually be replaced by your loginname!
The same applies to Send Password. This is taken from your user information - ie. the password you type into your user info is inserted into your loginscript when you dial your provider.
| WaitFor "login:" |
| Send "my password" |
So far your complete loginscript may look like something similar to this:
| WaitFor "login:" |
| Send Username |
| WaitFor "password:" |
| Send Password |
| WaitFor "protocol:" |
| Send "PPP" |
| WaitFor "ready..." |
![]()
For instance Demon Internet's is something similar to:
| Command | Carriage Needed? | Information |
|---|---|---|
| WaitFor "ogin:" | No | note the "ogin:" (not "login:") |
| Send Username | Yes | |
| WaitFor "word:" | No | note the "word:" (not "password:") |
| Send Password | Yes | |
| WaitFor "otocol:" | No | asking if you want to use PPP or SLIP? |
| Send "PPP" | Yes | telling the ISP we want to use PPP |
| WaitFor "HELLO" | No | waiting for the ISP to say hello (we are connected) |
The above
This is quite straightforward. This section is covered in detail within the install section - see 2.8 Configuring AmiTCP for further information.
These sections are really for advanced users only and nothing is needed within these areas for the beginner or new user. They allow you to add commands to your Startnet when connecting to the Internet or Stopnet when disconnecting from the Internet.
Refer to the AmiTCP online help guide for more information about these sections.
Go to the previous, next, chapter, table of contents.